Today we go through the process of installing a 2″ coil spacer lift kit on my 2003 Suzuki Vitara ‘PJ’. Read more for details and pics on how it went!
I recently bought a lift kit for my Vitara off of Ebay. They are available lots of places though. There are a lot of options on Amazon also.

I will start this off with saying this actually took some grit. I put this lift kit on by myself over the course of two long nights and I gotta say I was EXHAUSTED by the time I was done. Every bolt was rusty and I hate coil spring compressors (but read for more info as I found a better way AFTER I was done). Recruit a buddy to help if you can, it would have made this much easier.

Just a note, these are not exhaustive instructions, this is purely for entertainment based on my experience of installing a lift kit on my Vitara. Please follow the instructions that come with your kit.

The shock recommended in the lift kit instructions was a Monroe 32260 which is available from Amazon at the link below. I was in a hurry and it was the weekend so I had the AutoZone guy cross reference it over to an equivalent in Gabriel he had in stock.


Installing the front coil spacers


Spring compressors are available cheap on Amazon. However if you are trying to save a buck they are available to rent at most auto parts stores. The ones above I rented for $50 from AutoZone of which they returned the full $50 when I gave the tool back. The same goes for a many specialty tools, check to see if they are available to rent before you buy one.
NOTE: The link to the tool below is different than the tool I used. I used straight coil compressors that were hard to get to the bolt head on because of the lower control arm. I learned on a Facebook discussion after I was done that there is actually a ‘clamshell’ type spring compressor that would have worked perfectly in this situation.

Tip: When putting on the spring compressor grab as many of the coils within the compressor as you can. I didn’t realize that on the first side so the spring compressor didn’t get the spring as small as it could have. Here is a pic of the second side I did where I was able to get more coils within the compressor that made it easier to get out and back in.


In my case this was trickier than it sounded probably because I was working alone. I had to hold up the spindle, push down on the lower control arm, and slide the spring in at the same time.
2 Different ways to adjust camber
There are two different ways to adjust the camber when putting on a lift kit. The stock Suzuki parts aren’t adjustable from the factory. The first and probably easiest way is to buy a ‘camber adjusting bolt’ that will allow you to adjust camber. The second option is to ream out the upper hole in the strut to allow for adjustment.
Option 1: Purchase camber adjusting bolt
This option is pretty easy, just get on Amazon and buy a bolt. This also makes it easy for alignment shops to do an alignment. Feel free to use my affiliate link below to help support this site at no cost to you.

Option 2: Ream out a slot in the upper bolt hole for adjustment (what I did)


We will revisit setting the camber later on when we reassemble.
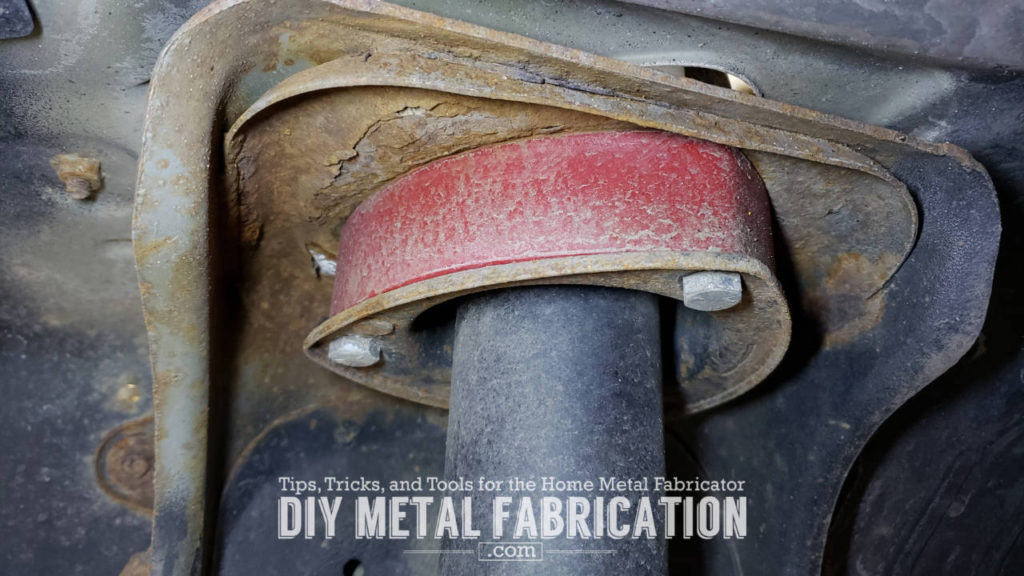
Installing the strut spacers
Just being honest here, it was way late when I was working on this and totally blanked on taking pictures of the strut spacer installation. Here are some pictures after the fact when I already had everything together.
These are a pretty simple bolt on. There is one step before you install the red spacer in which you need to cut the alignment pin off of the top of the strut, it is easy and only takes a minute per side.


Reassembling the front suspension.

Eagle eyes will notice there is a new upper strut bolt. I busted one of the factory ones trying to take it out. If you are lucky like I was your local ACE hardware store will have one. I used an M12 X 70mm 1.75 Pitch Metric Hardened 10.9 Hex Head Cap Screw.
Installing the rear coil spacers


Be careful here because my brake lines got pretty tight trying to get the springs out. If you don’t have enough slack in the brake lines you can either use the coil spring compressor or temporarily remove one of the mounts on the brake lines to give it a little more play.


To wrap it up I reinstalled the springs and put on the new shocks that bolted right in.
Conclusion


I hope that was helpful. Sometimes it is useful to see how other people did it with good pics as a supplement for the instructions that come with your kit.
This is a great way to affordably put a small lift on your 2nd Gen Tracker / Vitara. It was worth it and I would definitely do it again. Now I just gotta go out and do some wheeling again!
Now YOU, go outside and work on something!
Got a project in mind?
If you're tired of getting ignored by big shops or just want someone who actually gives a damn about the build, that's what I do.
Let's talk →
Fills me with dread stuff to do with cars.. but def interesting.. think its when I was 17 and messed up a disk pad change.. made aright hash ended up not driveable had to get a removal truck! lol
Interesting! I’ll let my husband read this post just in case he needs to do some DIY installation of lift kits. Great post!