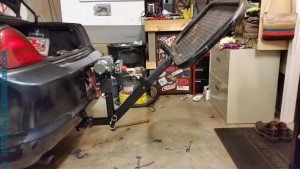
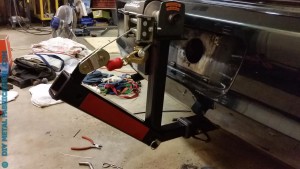
Check out Part 2 of our DIY Receiver Hitch Snow plow! It is time to weld some mounts for the winch to hook to, paint it, and wire it up so we can try it.
If you want to start from the beginning or jump to a certain part, here is an index of the snow plow build process:
DIY Receiver Hitch Snow Plow – Part 1 – lifting frame and winch
DIY Receiver Hitch Snow Plow – Part 2 – Completion of lifting frame
DIY Receiver Hitch Snow Plow – Part 3 – Building Plow pivot and cutting edge
DIY Receiver Hitch Snow Plow – Part 4 – Complete plow frame and assembly (First time plowing snow!)
DIY Receiver Hitch Snow Plow – Part 5 – Build blade angle adjuster
DIY Receiver Hitch Snow Plow – In Action! – Action pics and final thoughts
When we ended Part 1 Gertrude and I were tired so we called it quits. We had the basics built though, the winch mount and hinge mechanism was all working.
I already missed the first snow!!! Dangit! Luckily it wasn’t a big one and the snow melted from the driveway the next day or so.
Time to get crackin’!

I took the snow plow bracket off and took it apart so I could weld tabs on for the winch to hook to.
One tab goes just beneath the winch and the other on the receiver tube that raises and lowers.

Setting out a premade tab and a reinforcing gusset. I put the fairlead on to make sure it would clear.
TIP: you should seriously consider buying premade chassis tabs. They can be ordered online like the ones below for $2-$4 each in multi packs. They save a lot of time, look much more professional, and save money in the long run. Buy 10 or 20 of them and have them around your shop for when you need them. Your future self will thank you.

I used a curved tube tab and left a gap behind it because I had to leave room for the winch bolt to come through the mounting plate.
I forgot to take a close up of the tab I welded on the receiver tube. It is just a simple flat tab as you will see later.
Home Made Receiver Hitch Crane
Once welding on the tabs and reassembling, I wanted to try out one of the ideas I had for this project. Instead of just a receiver hitch snow plow mount, I also wanted it to be able to do other things. One of my ideas was a ‘gin pole’ setup where I could pin the receiver tube back to the main tube and use the winch as a home made crane to lift stuff.
Shackles are available in many different shapes and sizes. Small ones even better than the ones above can be had for <$10 each on Amazon: Lifting Shackles. With the shackles holding up the tube, I can use the winch for lifting.

With a snatch block in the end of a piece of tubing, I would be able to run the winch line up and over it to have a home made crane.

The home made receiver hitch crane works in theory. It won’t work without some mods because I had to reduce the winch to just one layer on the drum or else it would tangle when I raised and lowered the plow mechanism with weight on it.
After playing with it for a while, I finish welded everything then broke it down for paint.
Painting
I hate prepping for paint and painting. After many years and lots of projects, this is the best method I have found yet and it only has 2 steps!
- Rub all of the parts down with mineral spirits to get all of the oil and gunk off the parts
- Pour some Rustoleum in a roller pan then slather it on your parts with a 3″ roller
Now I never said this process was perfect, but I will tell you why I like it. There is almost no mess aside from some drips and minimal fumes. I don’t have to wear a respirator and/or have black boogers at the end of the day. The paint goes on THICK and seems to dry as fast as spray paint would.
Reassembly and Wiring
After the roll on paint dried, It was time to reassemble and get it ready to wire up. Until now, I had been just smashing my trailer light harness in the trunk lid when I was towing my trailer. That was fine, but I really don’t want to smash a big fat 10 gauge wire in the trunk lid. It would make some pretty good sparks before the 50A fuse blew.
All of the existing holes in the trunk already had wires going through them and I didn’t want to drill through the trunk and hit any of those wires. So first step was to make a hole so I could see what was going on between the trunk and the bumper cover.

Viola! I can see and have access to stick my hand in there to run wires. No fear, the hole will be completely covered by the license plate.

Notice I used a 1 1/2″ hole saw so my 4 prong trailer plug also fit through the hole (no more smashing it in the trunk lid).
DIY Grommet
On vehicles, you should never be running wires through a bare metal hole. This is a good way to burn your vehicle to the ground, especially if you don’t properly fuse the circuit. So the next step was to make a grommet.
TIP: Have an odd sized or large hole that needs a grommet? No fear, use some door edge molding to protect your wires or hoses from chafing
This is a trick I have been doing for years. I almost never have the right size grommet on hand, so with a roll of car door edge molding I can just make my own. The best part is, this stuff is CHEAP. There is no reason for you not to have a roll laying around your shop.

Cut off a piece roughly the same length as the circumference of the hole you want to make a grommet for.

It is winter and my garage is kinda cold. So I take the piece I cut and find a nearby appliance with which to heat it up. (Wifey loves it when I commandeer her kitchen appliances… I love you honey 😉 )

Now that the rubber strip is nice and flexible, I run down and install it. There is adhesive glue inside the base of the door stripping so it stays really well. No fear if it overlaps some, mine did.
Next up, I bolted on the winch and started running wires. Since this winch has a wireless remote, I only need to run a power and ground wire which I hooked up to the subwoofer kit I already had ran to my trunk. If you need to run a wire from your battery to the winch, I suggest buying an ‘amp kit’ because they are cheap and plentiful. If you just buy battery cable by the foot and a large fuse holder (if you can find one) from the auto parts store it can get expensive quick, whereas the kit comes with everything you need.

Finding a good place to mount the control box. You can just barely see where I pre-drilled two holes in the upright so I could mount the box with two self tapping screws. (pre-drilled with a drill bit because self tapping screws don’t like to go through 1/4″ thick steel).

Running the wires into the car. I need to make some kind of disconnect so I can unhook the wires from outside the car eventually.
Now we get to play!
Cool, but I need something bigger. How about the OOBER Receiver Hitch and Hauler Grill!
So after getting a little ahead of myself and standing on the hitch platform while lifting myself into the air, the winch line quickly got tangled (oops). When using winches, their rating varies based on how many wraps are on the drum. In my case, my butt is big enough that it caused the winch line to suck into the layers beneath.
Therefore, I reeled out ALL of the winch cable until I was left with just the drum. There is an allen head set screw that holds the line onto the drum.
I then took the cable and measured it so there was only one wrap all the way across the drum when it was in the up position. Wrap some electrical tape around the wire on both sides of the cut (so it doesn’t fray after you cut it) then cut with bolt cutters.

After shortening the cable and adding some reflective tape (so nobody knocks their knee on the tube when walking past)
After raising myself up and down while standing on the rack, I thought the winch was still working kind of hard (no fat jokes, it is winter and holiday season after all 😛 ). After thinking about it for a while, I discovered that I could mount the snatch block to the tube and hook the cable back under the winch. Like this:
I can actually hear that the winch isn’t working as hard, but don’t take my word for it. Check out this illustration of pulleys and mechanical advantage I found on Wikipedia – Mechanical Advantage:
One of my favorite sayings is “Work smarter, not harder”. I think my cheap little winch agrees with me. My example would be similar to setup 2 in the picture above. You can see where the force required to lift the object is cut in half.
I still need to cut the winch hook off and connect the winch line thimble directly to the shackle under the winch so I can lift the receiver tube higher without it binding.
Here is a pic of the setup removed from the receiver hitch.
Now that the basic mechanism is built, stay tuned for Part 3 where we start building the actual DIY Snow Plow.
If you want to start from the beginning or jump to a certain part, here is an index of the snow plow build process:
DIY Receiver Hitch Snow Plow – Part 1 – lifting frame and winch
DIY Receiver Hitch Snow Plow – Part 2 – Completion of lifting frame
DIY Receiver Hitch Snow Plow – Part 3 – Building Plow pivot and cutting edge
DIY Receiver Hitch Snow Plow – Part 4 – Complete plow frame and assembly (First time plowing snow!)
DIY Receiver Hitch Snow Plow – Part 5 – Build blade angle adjuster
DIY Receiver Hitch Snow Plow – In Action! – Action pics and final thoughts


