Traction offroad is the name of this game and nothing adds more traction than differential lockers. Today we go through a how-to add a ‘welded’ rear locker to any rig that is technically ‘free’ if you are willing to put in the sweat equity.
So far I am still at less than $2k total with my Suzuki Vitara build ‘PJ’. With this project, it is my aim to spend as little money as possible and spend only where it makes a difference. The next step to increase the offroad traction. The best and cheapest way to do that is to weld up solid the spider gears in the rear differential.
I start at the basics so feel free to skip ahead if you already know some of this material.
What is a differential?
A differential is a component inside of the axle of vehicles that allows one tire to turn faster than the other tire during turns. There are generally one or two axles in a vehicle depending on if it is 2wd or 4wd. In our case here the Vitara has two, one in the front and one in the rear. Within the differential there is a ring gear that transfers rotating force into a carrier that houses the ‘spiders’ and side gears that allow the tires to spin at different speeds.
Basic types of differentials
- ‘Open’ differentials send all power to the tire with the least amount of traction.
- ‘Limited Slip’ differentials use clutch packs or worm gears to transfer SOME of the power to the tire with more traction
- ‘Locked’ differentials send all power to both tires. There are generally two types of locked differentials: ‘automatic’ which have a racheting mechanism for disengaging when cornering under low/no throttle and ‘Selectable’ which are engaged via air/electronic/cable actuators
- ‘Welded’ differentials are really the same as ‘locked’ but they never unlock because you literally weld the ‘open’ differential together so both tires will always spin. The downside here is that there will be additional tire wear and some hopping/chirping of tires during sharp turns on pavement.
Differences in brands
Welding the gears in a rear differential varies in difficulty depending on the vehicle it is being done on. This isn’t because the actual weld itself is harder, it is more of a problem of access. In a typical American vehicle with Dana 35, Dana 60/70, Ford 8.8, Ford Sterling, AAM axles you can just pop the cover and can usually see the spider gears. I have even welded the spiders on some of them without even taking anything apart. On the imports with drop out 3rd members it is a different story though.
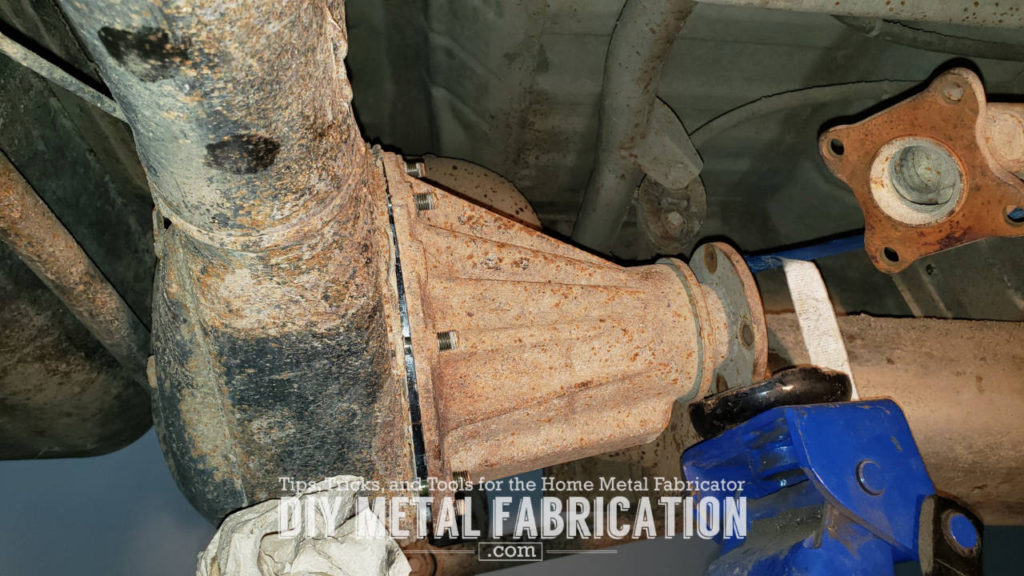
Since the Suzuki Vitara/Trackers have drop out 3rd members in the rear axle, there is no cover to remove to get access to the gears. The rear axleshafts and driveshaft must be removed then differential un-bolted and removed from the axle housing. To get to that point we start with removing the wheels and brakes.
Disclaimer
WARNING, this project is not for the faint of heart or automotively challenged. However if you have a decent set of tools along with a few specialty tools and a lot of patience (or knowledgeable friends) anybody can do it. Also, this is meant to be a guide and is not exhaustive, some aspects of this project may have to be researched further on your part to cover knowledge gaps.
If in doubt there are always alternative options. Maybe you could remove the differential pumpkin from the housing yourself and drop just the pumpkin off at a differential shop to add a mini spool or automatic locker and re-set up the gears. You would save money by them not having to also disassemble or reassemble the axle itself.


TIP: Before taking apart any complicated device, be sure to take lots of pictures! You can get yourself in a pickle if you don’t remember how something goes back together. Digital pics are free and you can always delete them later!


Slide the axle shafts out ~4-6″ or remove them completely before starting to remove the differential pumpkin. Then drain the differential using the 3/8″ drive drain plug on the bottom of the housing.
TIP: If you can’t get the differential to peel off of the housing due to the RTV (sealant), you can put a floor jack near the pinion end of the differential and apply light pressure until the seal is broken (don’t go crazy with it). You should then be able to remove the differential by hand.


Here is the part where I will tell you it is a lot easier to just pay the $150 or whatever it costs for a mini-spool. If you were going to use a mini-spool you could just replace the spiders with it and reassemble. However I am a glutton for punishment so continue reading to see how I welded the spiders up and reassembled (free! but also a lot more work).


Safety warning – I used nitrile gloves, isopropyl alcohol, a rag, and 5 gal bucket to clean the differential parts which worked well. PLEASE be careful when selecting a cleaning agent. Some (most?) chemical residues are hazardous to your health when welding the parts after cleaning such as chlorinated brake cleaner. See this article for more info: Safety Alert!

Due to the unique design of this differential case, I didn’t actually weld the spider gears (the 4 small cone shaped gears). What I ended up welding was the side gears to the carrier housing (the splined ones that the axle shaft goes into). The spider gears and thrust washers were in there when I reassembled it which helps to line everything up, they just didn’t directly get welded.


After welding, I put the diff back in the oven that was off but still warm so the parts could cool slowly/uniformly (reducing risk for cracks in the welds).

Challenges
When putting the side cap back on the carrier it was tight partially because it is a machined fit and partially because there was likely some slight warpage or weld spatter I missed. So to get the cap to shrink up I put it in the freezer for a bit (the carrier was still warm). I took the cap out of the freezer and put it in the diff but got it cocked in there before getting it all the way down. By the time I ran across the shop for the hammer it was too late and the two had become one. I couldn’t get the end cap back off so I had to put it in the press and send it the rest of the way home. Luckily I had aligned the bolt holes when I started putting on the end cap. I partially threaded a couple bolts in to keep the holes lined up in the press.
A guy that owned a shop that I used to buy metal from a long time ago once said “Any tradesman can fix his mistakes” which stuck with me ever since.

Torque Specs
The below differential torque specs were provided by ‘skyhiranger’ at this link: https://bbs.zuwharrie.com/content?topic=96669.0
From a 92 FSM (Field Service Manual, all in ft-lbs, except as noted)…..
diff oil filler plug…25.5-36
diff oil drain plug…13.5-18
prop shaft flange bolts…36.5-43
bevel gear bolts…65.5-72
bearing cap bolts…51-72
lock plate bolts…7-10
diff carrier nuts…36.5-43
upper arm bolts…29-43
rear wheel speed sensor bolt…13.5-20
pinion bearing preload…7.8-14.7 in-lbs
pinion starting torque…4-7.5
bevel gear backlash… .005-.007
Reassembly


Once everything measures out right, we reverse all of the initial disassembly steps and put it all back together. Use RTV on the sealing surface and put the differential back into the axle housing, reinsert axle shafts, reassemble brakes, bolt in driveshaft, etc.

Below is a video from Kansas Rocks after completing the rear differential locker. I will tell you straight up that this little truck with 29″ all terrains went all kinds of places it probably shouldn’t have and kept up with a bunch of Jeeps with much larger tires. The biggest hangup was ground clearance which will be addressed eventually.
Again, this project is not for the faint of heart or automotively challenged. However if you have a decent set of tools along with a few specialty tools and a lot of patience anybody can do it. If in doubt there are always alternative options like listed at the beginning of this article.
Hope this helps. I tried to take lots of pictures to take the mystery out of this job however my guide is not exhaustive and you will likely have to do additional research on specific parts to fill any knowledge gaps.
Now YOU, go out and work on something! Then go rock crawling, drag racing, mud bogging, or whatever sport it is you are reading this for.
Got a project in mind?
If you're tired of getting ignored by big shops or just want someone who actually gives a damn about the build, that's what I do.
Let's talk →