Today we cap the giant hole we just made from cutting off the rocker panels and reinforce the rock sliders. Then we reattach the fenders using some race car parts.
We left off last time having started on the rock sliders. One tube is straight and the other has two 25 degree bends to connect them together. Today we will strengthen them up by adding some support between the two tubes. This can be done lots of ways, keep reading to see how I did it.
Finishing the Rock Slider Rails
I grabbed some random 1″ tubing from my pile and decided that would be the best and simplest to support between the two tubes. I could have used the same size but I wanted it to be a little smaller so it would blend in more (also I just thought it would look cool).
Cutting the small tubes as reinforcement. There wasn’t much science here other than cut then cope with the sanding wheel until they fit right.Cut, sand, cut, sand. My flap wheels hate me, good thing I keep a lot of them in inventory.
Below are the exact grinder flap disks I have been using for the last year or two. They are super versatile and have done well for me. I don’t even use normal grinding wheels anymore (unless I am working on something that is big and thick), even then I end up finishing them with a flap wheel. I like the flap wheels because they leave a nice surface that is ready to weld or paint.
All three supports cut and placed for each side. I held the tubes together with some big zip ties.All welded up!
Finishing the rocker panel patches
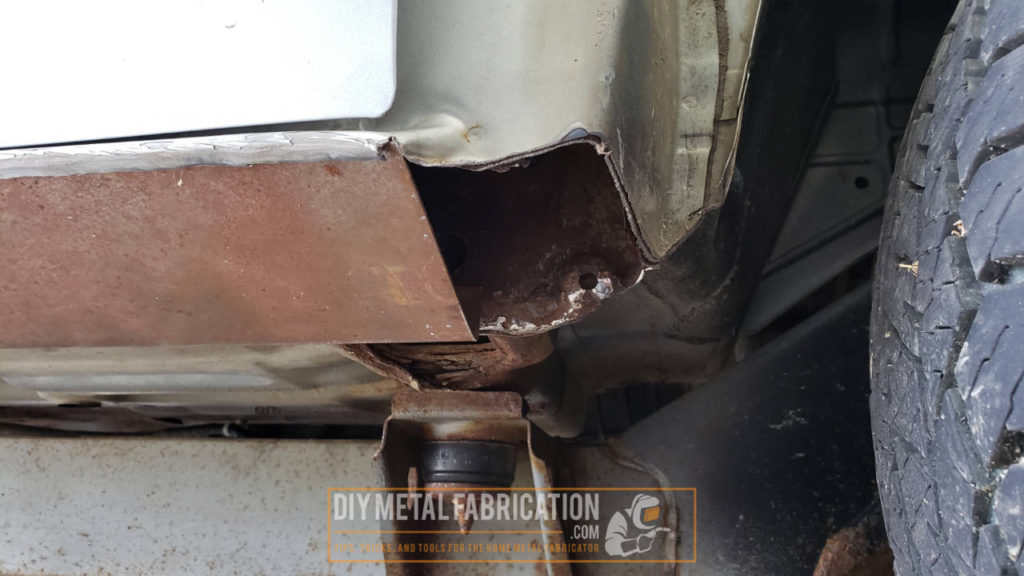
After Part 1, we had cut a HUGE hole down each side of the truck. Now we get to do the hard work of patching them back up. I am not a pro at any of this, I just try stuff until it works. In this case I had pretty good luck making new rockers from a sheet of 14 gauge I had laying around already.
To start with, I cut a piece of 14 guage to 5 1/2 inches wide. This was 1″ wider than the hole I needed to patch.I then put it in the finger brake and bent up 1″ to 90 degrees. I could only do 48″ at a time since that is how wide the brake is. This was just about all this bender can handle.Now you can see why I left a lip on the top side when I cut the rockers off. This gives me a slot to insert the new rocker patch into. Obviously the first fit doesn’t line up very well, more work is required.Here is a view from the bottom side. You can see how I needed to trim it in spots so it could fit up higher. Most of this fitting I just marked with a sharpie then cut with a pair of metal shears.
Sheetmetal shears
Here is a quick note about sheetmetal shears. They have a mechanism in them that applies mechanical leverage to cut thicker metals a little bit easier than tin snips which don’t have the extra leverage.
Also, they come in right, left, and straight. The reason for this is because they actually bend the metal a little as you cut because of the scissor action. Depending on the blade setup on the shears it is hard to turn certain ways, that is why they make left, right, and straight versions.
Having said that, I only personally have straight snips which will work in most cases (though I have been looking for an excuse to get left and right shears).
Here is my final fitup before welding. I had to bend one part flat to reach where the body was a different shape around where the B pillar was.After a lot more trimming and fitting. Once I got the main panel fitted well, I went ahead and painted the backside to keep it from rusting.Then I tacked the panel in. I did NOT weld it all the way around because it isn’t really needed. Since it won’t be seen, I have another plan to seal it up later.Once I had the main piece in, I also needed to fill in about a 4″x4″ hole towards the front.This one wasn’t too bad. I just bent it up by hand and cut it out with the sheetmetal shears. This is where left and right shears would have helped a lot.Here it is fitted up after some sanding with the flap wheel on the grinder. I welded the patches together first then hammered the piece up to fit the body. I did fully weld around this piece of the patch panel since it would see a lot of debris coming off the tires.For the back ~10″ that hadn’t been covered yet, I cut another 5 1/2″ wide piece and bent it in the finger brake. I then held it up in place and marked it where I needed to trim for the rear wheel well.I also bent up a little wing to weld inside the wheel well. These flat wide vice grips are awesome for bending sheetmetal.
I also painted the backside of this once it fit well before I welded it in.Here is a view from the rear wheel well where you can see I bent up the ‘wing’ on the back side. I ended up cutting another small filler piece to cover the hole and weld to the outside sheetmetal.Back panel tacked in. Caught the paint on fire just a bit, no biggie.
Quarter Turn Dzus Fasteners for attaching the front fender
For this project, I cut the sheetmetal up so high that I lost the bottom bolt hole to attach my fender. These fenders only have 5 bolts holding them on so I couldn’t just do without or it would be flapping in the wind. I went over and checked my inventory where I had a handfull of Dzus fasteners, also called quarter turn fasteners.
Quarter turn Dzus fasteners are used a lot in racing applications where the pit crew needs to remove panels quickly to work on a component or engine. To remove a panel, all you need is a flathead or even a coin. Some quarter turn fasteners even have a tab on them so you don’t need any tools at all.
You can buy them in 10 packs with all of the pieces you need to get started. I like the ones listed below that have the long tab so they can be cut to fit.
Since mine had the long tab, I was able to just bend the tail to weld onto PJ.Here is a look at the Dzus quarter turn fastener from the top side. The fastener hooks around the wire and pulls the panel down tight when you turn it clockwise.I then with a bolt at the top holding the fender in place, I ground the tab until it was the right height for the fender to be in line with the door. Then I tacked it on, removed the fender and finished welding it.Once the tab was welded on, I loosely put the fender back on with one bolt at the top. I then installed the quarter turn fastener into the tab put a dab of lithium grease on the head then gently let the fender come down on top of it so it would leave a mark.Here is a (blurry) view from the backside. You can see the lithium grease squirting out some around the fastener.
Tip: I use Lithium grease often for transferring marks between pieces that fit together or where multiple holes need to be marked for drilling. This is a great trick and can save you from having to do a lot of measuring.
I didn’t realize until I was writing this post, but they actually make a quarter turn fastener with a point for doing this exact thing. If I did this more often I would probably buy it.
Here is the fender off after I had already drilled a pilot hole with an 1/8″ drill bit. Once I drilled the pilot hole, I then went back with a step bit and stepped up in sizes until it fit right (honestly I didn’t even pay attention to what size it ended up being).Once the center hole was drilled, I put the quarter turn fastener in place then marked the holes for the two rivets and drilled for them also.Before installing the fastener, I put on some painters tape and painted both 1/4″ at the bottom where I had cut the fender off and also on the backside of where I drilled to prevent rust in the future.These are installed with a normal pop rivet gun. They are cheap and easily available. If you don’t have one you can check them out on Amazon HERE.
Thanks for reading! I wanted to get into detail on the step by step on the quarter turn fasteners because they are super handy for making quick to remove panels that don’t require tools. I hope you get value from it.
Stay tuned for Part 3 when we will seal up the rockers and paint them then attach the rock sliders! There will also be lots of finished pictures and even some damage!?
Got a project in mind?
If you're tired of getting ignored by big shops or just want someone who actually gives a damn about the build, that's what I do.