Getting the new plasma cutter set up! Had to figure out how to get my air compressor up 8ft onto the mezzanine (it was interesting for sure). I also got the plasma table fixed and added a video for knowing which kind of proximity switch to buy PNP or NPN for repair.
Setting up the big air compressor
In order for me to get my big air compressor up and running, I needed to get it installed into it’s final destination which is 8ft up in the air on the mezzanine that I wasn’t done putting together yet. Well it is mostly assembled but I hadn’t put proper plywood on the top of it yet, so off to Menards.

Very happy with the new truck. I can haul lumber while the kids are watching movies in the back. Silence (somewhat) and productivity = Winning.

3/4″ tongue and groove plywood with rafters on 12″ centers should allow for some pretty significant load bearing in the future. Who knows what will end up there eventually, might as well overbuild it now.
Call an airlift!
I debated on not posting this, but it is real life and it happened. Nobody got hurt. Do as I say, not as I do.
I am working by myself 99% of the time, so sometimes I have to get creative. My air compressor only weighs probably 300 lbs or so. I can move it by myself on a dolly so it can’t be that heavy. It was definitely too heavy for me to get up on the mezzanine by myself though.
I went through a couple of different ideas some including PJ with an elaborate elevator run from the winch, among others but they seemed like a lot of work. Ran the neighbors tractor over there one day while I was borrowing it and it was ~3ft short of reaching and the rear end probably wasn’t heavy enough to lift it up that high.
If only I had something that was taller than the mezzanine…

If only I had something to winch it up with… <digs through tool bins>

(notice my scrap wood supports that distributed the load from end to end and 4x4x.25 square steel tubing all screwed together. It was way overkill for the weight)


After level 1 was reached, level 2 had a tougher boss at the end. Due to the height of the rigging, it didn’t get the feet of the air compressor high enough to get up on the mezzanine. So to defeat this boss I had to re-rig the air compressor so it was on its side and therefore shorter. Once it was high enough, I lowered the rigging while sliding it onto the mezzanine. Since I was by myself I didn’t get pics of that part.

Nobody was hurt during this process and I was well within the weight capacity of the scaffolding (typically 1,000lb for this type). Having said that though this is not the intended purpose of scaffold and don’t try this at home 😀

Random note. I was concerned about the air compressor on the mezzanine transferring vibration/noise into the house through the breezeway. I am happy to report that it is completely inaudible inside the house, so I am free to work into the wee hours of the night/morning (some of my most favorite and productive hours).
Aummmmmmmm….. (or whatever it is the yoga people say)

No point to it really other than I thought it was cool.
If you read this far, you are probably cool too, so cheers. ;D

Compressed air, meet plasma cutter

(feel free to mock me in 5 years when it is still in the same spot)


Whatever fitting type you go with, go all in. Just buy a couple packs of them and convert ALL of your tools at once. Few things are more annoying than leaky air tools. I use the automotive style fittings but I think any of them are good as long as you don’t mix the different styles.


I also threw a desiccant dryer in there. Yes it is technically backwards but I didn’t have the correct air fittings on hand… Worked fine and is still that way today.
Fixing the proximity limit switch (again)
So at the end of part 1 I threw up a video on how to test proximity limit switches. Turns out I was on the right track, but had an intermittently failing sensor. I looked in the Baileigh manual wiring diagram to see what sensor it needed, but it didn’t specify what kind and the drawing wasn’t quite detailed enough for me to tell.
Long story short, I ordered a couple of the wrong sensors from Amazon. When I finally got the right one figured out, I made another video so you wouldn’t have to make the same mistakes as me. I went out of my way to describe the voltages on the meter because this is the video I needed when I was trying to diagnose mine.

If you have a Baileigh PT-22 (and probably also applies to their larger tables), the kind of sensor you need is an 8mm NPN NO. Check the link below for the one I bought.

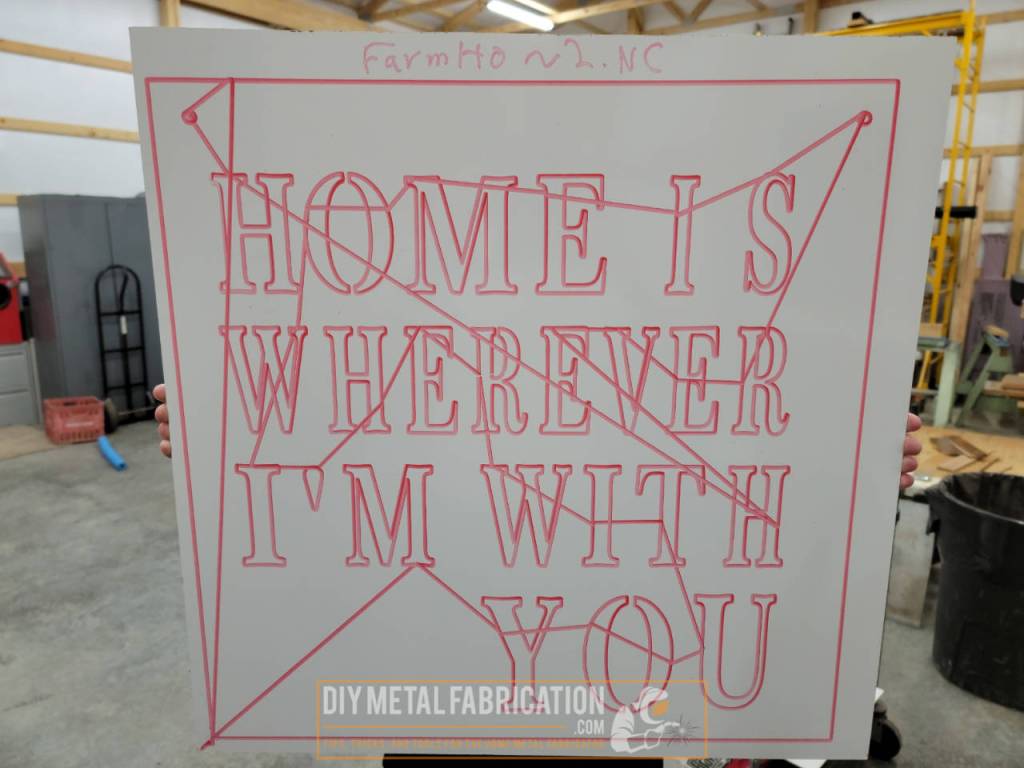
No risk trial
Did I mention I like to limit my downside risk? I had an epiphany somewhere during the setup process and came up with a 0$ test rig that worked flawlessly. Nobody likes to waste metal and it is expensive…

How did I build it?
- I took the torch out and zip tied it off to the side. Found a scrap piece of electrical conduit and wrapped a layer of duct tape around it to make it the right size for the holder.
- For the pen holder I grabbed some leftover insulation from the pole barn build and wrapped it around the dry erase marker until it was the same size as the inside of the conduit. Put a small piece of tape on it so it wouldn’t unravel.
- Then to get the pen to actually write, I dropped a small 3/8’s socket extension on the top of the pen inside the conduit to add some pressure.
- Drop a piece of white board cut down to 2×2 and let’er rip!
Why did I build it?
Honestly, I didn’t trust the machine. I didn’t know (at the time) how to view .NC files to know what I was printing, I didn’t know how/where to set the material on the bed, and I didn’t know if the new sensor would work reliably. This test worked out all of those things with 0 cost (more on viewing .NC files in the next post). The filenames on the handheld controller are also cryptic because they are shortened. The file name that I ‘cut’, I wrote at the top which is obviously not very descriptive when it is shortened like that.
Conclusion
Thanks for reading, hopefully some of these tips will save you time setting up or repairing your CNC plasma cutter. Stay tuned for the next article where I start cranking out some cuts!
Got a project in mind?
If you're tired of getting ignored by big shops or just want someone who actually gives a damn about the build, that's what I do.
Let's talk →