Progress Report 22 – 30×48′ Pole Barn build


Wahoo, finally get to install some fun stuff! In this post we start hanging surround sound speakers, TV, fans, and a french cleat system all the way around the perimeter of the shop. Check it out for more!

The sheetrock and painting drudgery is finally getting close to being over, so I took a break to go ahead and install some fun stuff. The nerdy electronics setup is much more fun than sanding and validates all of that time spent planning out wiring and outlet boxes.

Steps to building a pole barn
Here is my big tablefull of goodies that I have been collecting just waiting for the opportunity to install.

Installing plugs for the surround sound and wall mounted speakers

I have been planning this for a long time and think I found the perfect solution for me. I wanted to hook up my surround sound without having to pre-identify exactly what kind of wall plate I needed. I was able to find these speaker keystone plugs on Amazon that fit into a standard keystone plate which are available in many different configurations.

Steps to building a pole barn
One thing I was particularly excited about was these speaker terminals that fit in a common keystone faceplate.
Steps to building a pole barn
Got all of the faceplates assembled on the ground and labeled before installing
Steps to building a pole barn
These faceplates and connectors made installing these really easy. Strip the wire, push the button, and stick it in just like you normally would on the back of a speaker.
Steps to building a pole barn
They look great and super clean once installed. I am excited that I don’t also have to mess with banana clips.
Steps to building a pole barn
Here is one of the plates way up on the wall. I had already mounted the brackets to the studs for the speaker shelf but not the speaker itself yet. I ended up using a premade pine stair tread for the shelf wood.
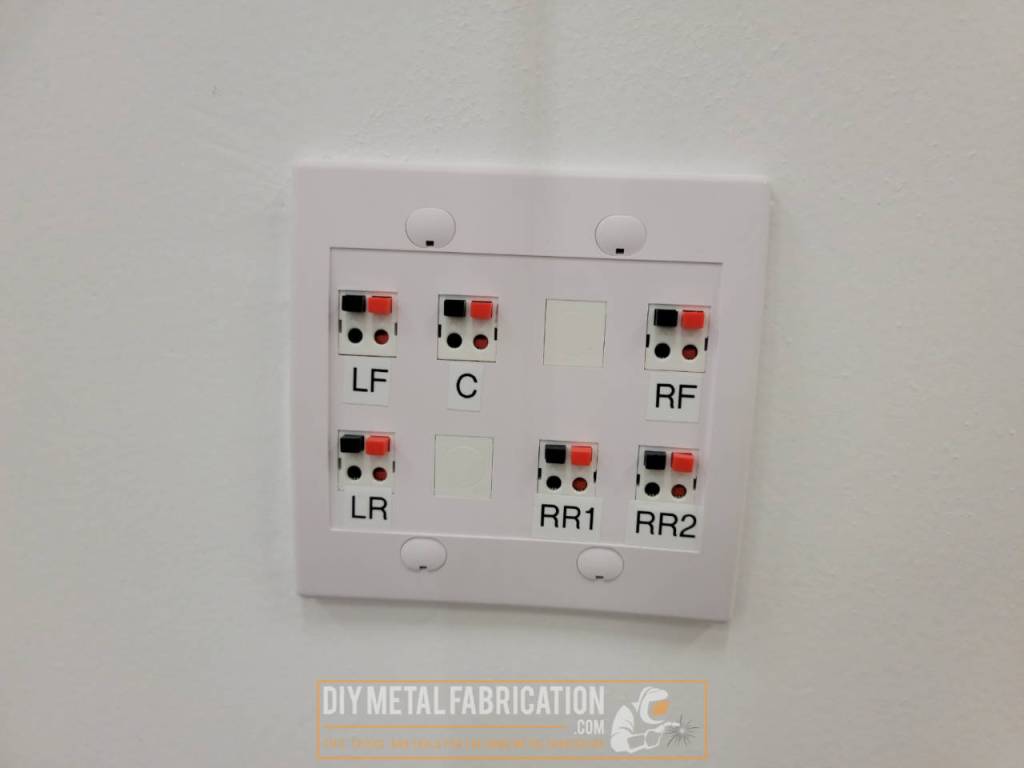
I didn’t want to hang the speaker directly to the wall because I have a tendency to swap out technology from time to time and wanted to keep my options open for future changes.

Setting up the shop surround sound

Here is a quick description of how I set up the surround sound in the shop. If you have been following along, you know I pre-ran some 2″ electrical conduit through the wall and across half the ceiling. To run my audio, I have a firestick plugged into the TV then an audio wire from the TV’s 1/8″ headphone plug that goes down to my stereo through the conduit then connects with a converter to the red/white aux in plug. From my stereo, I have plugged it into the above shown wall plugs going out to my speakers.

So far it works AWESOME! Ideally I would really rather have a Chromecast with Google TV instead of a Fire Stick (though the fire stick works just fine, the only thing I miss is the ability to cast video wirelessly from my phone). Tidal is awesome for watching music videos and Amazon Music is pretty good too.

Steps to building a pole barn
Got my TV hung. It is a 40″ but looks TINY up on the wall like this.

DIY Perimeter French Cleat System

As with most of my projects, especially these finer details towards the end, I have put a lot of thought into the end goal. I wanted a way to hang anything anywhere without having to mess around with finding studs putting in screws or patching holes. I came up with a mashup of ideas. Instead of doing a french cleat ‘wall’ where it is kind of like a pegboard with a whole wall covered in them, I just wanted a single cleat board that went around the perimeter of the whole shop. This allows me to hang anything anywhere anytime without any tools.

Steps to building a pole barn
Causing a raucous in my FIL’s basement cutting down this 3/4″ maple hardwood for my french cleat system. This stuff was tough and smoked a lot causing the smoke alarms to yell at us pretty much the whole time we were ripping these two 4×8 sheets
Steps to building a pole barn
Two 4×8 sheets worth of french cleat material! Should be enough for the whole shop plus plenty of extras.
Steps to building a pole barn
I started with the front center of the shop. Marked the center of the french cleat board and pre-drilled/countersunk the first hole.
Here are the countersink bits I used:
Steps to building a pole barn
Once I got the first screw in, I leveled it and fastened it to every stud in the wall.
Steps to building a pole barn
Got the front wall done. This is three boards or 24′ worth of french cleat. I decided I kind of liked it this way and didn’t want to go all the way to the corners.
Steps to building a pole barn
French cleat, TV, and speakers all installed and looking good.
Steps to building a pole barn
Got the oscillating fans re-hung
Steps to building a pole barn
Tried to get a good pic of using my laser level. This one does horizontal and vertical lines but was still pretty cheap. I usually either stick it on a ladder like this or bolt it to the top of my tripod.
Steps to building a pole barn
More french cleat. I am excited that I only have to do this once.
Steps to building a pole barn
Used my right angle driver to drill and put a cross screw in a couple locations where the seam didn’t meet on a stud. Most of the seams landed on a stud, I just forgot to cut a couple.

Installing trim around the base

This is another one I deliberated on until I came to the best solution. The trim boards in the shop are going to have a rough life. Since this is a pole barn and not a conventional garage with footers and a 6″+ concrete footer sticking up above floor level, my baseboards are going to be right on the concrete. That causes concerns about bugs, salty water, mold, scratches, etc. After looking at the different options I came to the conclusion that PVC was the only way to go.

PVC trim boards cut and attach just like wood but don’t rot and since I want them to be white, never need painted. As an added bonus if I run stuff into them and dent them, they are white all the way through so it won’t be visible. So I bit the bullet and just did it the right way. Buy once, cry once.

Steps to building a pole barn
OUCH! $32.99 PER BOARD for a 1x6x3/4″x12′ and I had to buy quite a few of them…
Steps to building a pole barn
I also picked up some new saw stands and tossed out my old hand-me down free sawhorses. My biggest issue with the 2×4 sawhorses is mostly just because they are so big and don’t fold, they take up way too much room.
Steps to building a pole barn
These new ones are sweeeeet. They have a large directional roller, small omnidirectional ball type rollers, and a non-rolling portion for when you don’t want stuff moving. Also they fold up really small when not in use.
Steps to building a pole barn
As expensive as these PVC boards were, I triple measured before every cut and didn’t waste a single piece.
Steps to building a pole barn
This is why almost everything in the shop is either on wheels or a skid that I can pick up with the pallet jack. Makes it super easy to access any wall.
Steps to building a pole barn
Each board I put upside down, caulked along the entire bottom edge, then flipped them over and screwed them in. I figured if they were all sealed to the concrete then there was less chance of any fluids leaking under them and getting to the framing.
Steps to building a pole barn
This is why I did the taller 1×6. It catches almost all of my workbenches and tool carts before they hit the wall.
Steps to building a pole barn
Used the same 1×6 sized trim for around the windows. I will face them later with a smaller size.
Steps to building a pole barn
Pulled the exhaust fan then sealed and trimmed it out. I used a piece of 3/4″ backer rod to fill the last little gap to the wall.
Steps to building a pole barn
Came out pretty good. I am going to build a cover on a hinge to seal this fan up better while not in use. It has louvers on the outside but they don’t really ‘seal’ out any drafts.

That is all for now. Lots more little details going in every day. I recently picked up a 3d printer and a couple other toys you might have caught glimpses of that are going to one-up my project ability and speed. Now on to getting the ceiling sealed up with vapor barrier and steel before it gets too cold out!

Now YOU, go outside and work on something!

Leave a comment

Your email address will not be published. Required fields are marked *